Extron Rxi Interfaces
The Extron Rxi series of RGB interfaces have many uses and can be found used for decent prices. This page will outline their best features for retro-gaming and explain how to connect one to your setup, focusing on the Extron 201 and 203 Rxi. Please read on for more info:

The Extron 201 and 203 Rxi should be the final device in your RGB setup, between your switch (with consoles connected) and display. The Rxi would then connect directly to your display, or to an Extron Emotia, then your display, if you’re looking to downscale your video.
Inputs:
Both Rxi’s have a DSUB (VGA-style) input. In order to connect your retro gaming consoles, you have a few choices:
– Use a gscartsw that offers both SCART and VGA outputs.
– Use a Sync Strike.
– Purchase a SCART to VGA cable (these cables do not convert to VGA, they’re simply connector adapters)
– Make your own SCART to VGA cable; Google “scart pinout” and match it to this RGB pinout.
Video Outputs:
The Rxi series offers both VGA and BNC outputs: The BNC outputs apply the RXi’s processing, while the VGA is simply a passthrough. More details about processing and features can be found below.
If you’re using an RGB monitor with BNC or DSUB inputs, this makes things very easy! Simply purchase a BNC cable, or a BNC to VGA cable (links to the right –>). When connecting, make sure to only use the sync outputs that match your system: “S”, or “H+V”. More info can be found on this in the sync section below.
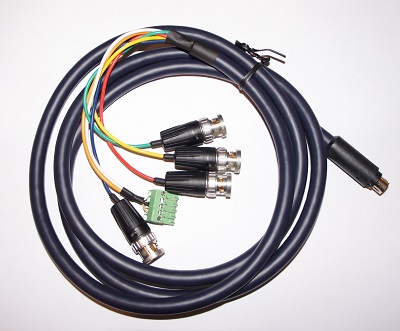
If you’re using an XRGB Mini Framemeister you have a few choices. First, Retro Console Acessories is now offering a cable designed exactly for Extron devices that connects directly from the Rxi to the Framemeister!
Alternatively, you can use a BNC to SCART adapter (make sure to select “Output (e.g. Extron)” from the drop-down menu), plus a SCART to XRGB Cable. Other upscalers might just need BNC to RCA adapters, or even just accept the signal via a VGA port. I suggest researching your solution for more info.
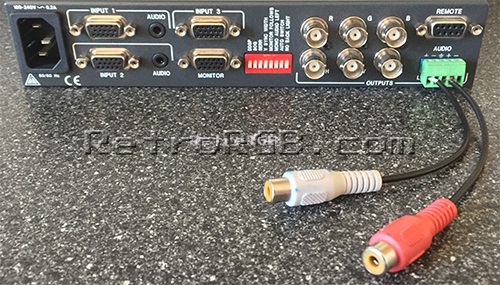
Here are the rear ports of the 201 and 203 Rxi:
Audio Outputs:
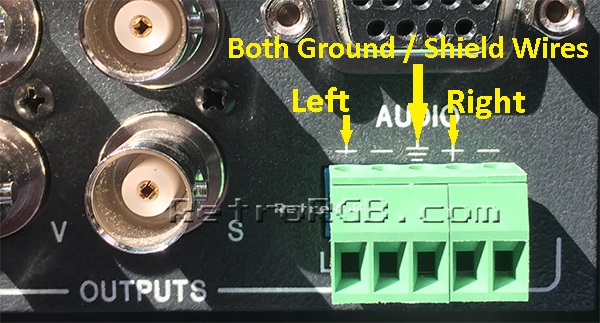
The Rxi’s audio output is found on the lower right and uses something called a Phoenix connector. Extron makes an RCA to Phoenix connector and you can even get the same thing directly from Retro Console Accessories.
It’s very easy to make your own though! If your Rxi didn’t come with an audio connector, you can get ones from the links on the right, or directly from Digikey. I just get a cheap cable with female RCA inputs and cut that to size. Alternatively, you could always just cut the RCA ends of whatever cable you are using and wire them directly. See picture examples below and here’s links to the PDF wiring guide: http://www.extron.com/download/files/userman/68-349-01__G.pdf
Different uses for the Rxi boxes
Sync:
The main reason I started using an Extron Rxi was for it’s sync processing. The Rxi’s are NOT sync strippers, they’re simply sync processors (explained in the paragraph below). For more information on sync, please see the sync page.
Most 5th generation consoles (and earlier) output RGBs, which is simply RGB+csync. Some newer consoles output RGsB, which carries the sync signal on the green line. Also, VGA is actually RGBHV, which is similar to RGBs, but with the horizontal and vertical sync signals separated. No matter what sync signal you input into the Rxi, it will output either RGBHV or RGBs. There’s no complicated configuration, simply connect whichever output your display requires. This is great for displays that only accept RGBs, such as the Sony PVM and BVM RGB monitors…as well as the XRGB Mini.
A good example of how I put this feature to use is GameCube component cables which have been VGA-modded; After the mod, the GameCube now outputs 240p, 480i and 480p, all through RGBHV. I can use the RGBs output of the Extron Rxi to connect that signal to all of my RGBs-only devices.
Also, the Rxi’s seem to help when using consoles that are known for sync issues, such as the Sega Genesis.
Options:
Both Rxi’s have the same front options. I’ll explain basic uses for each:
– The Level Boost and Peak Control are useful if there’s a long distance between the Rxi and the display. I’ve never really needed to use them, but they can help clean up the images in certain scenarios.
– The Centering controls are perfect for use with the Extron Emotia, when doing 480p-to-240p conversion. They allow you to shift the image up and down by one pixel, allowing the scanlines to match up, if slightly off.
The rear options are also the same on both units, with the exception of the 203, which ads an “auto switch” setting to the rear. I have all of mine set to off, except the following:
MONITOR FOLLOWS – Turn this on to enable the second, passthrough output.
AUTO SWITCH – If you own a 203 Rxi, turn this on to allow it to switch between inputs.For more details on what each switch does, please see page 2-13 of the 201 Rxi manual, or page 8 of the 203 Rxi manual.
VGA / RGB Switch:
The 203 Rxi has three VGA inputs and an auto-switch feature. I find this to be extremely handy, as I have many devices connected to my setup. Input’s 1 and 2 have audio as well, but Input 3 does not.
Cheaper Alternatives:
If you’re only looking for a sync combiner, you can find very cheap Extron boxes that lack many of the features of the 203 & 203, but still work perfect for RGBHV to RGBs conversion. Most will come without power supplies, but you can find cheap alternatives and just make you’re own; As long as the PSU specs match, it’ll work fine. Here’s an example of what you can do:
Extron RXi 192v (I paid $16 for mine):
Power Connector: http://www.ebay.com/itm/262679778342
PSU: https://www.amazon.com/gp/product/B01HLTXRYI/
480i to 240p Conversion:
On some displays, if you switch DDSP on when displaying a 480i signal, the image will appear as 240p. This is mainly dependent on the display – This will not work with any digital display (or processor) and will only work on a very small percentage of RGB monitors. I’ll post a picture soon, but the conversion can be described as “better then 480i”; It’s not nearly as sharp as 480p-240p, but there’s less flicker and the scanlines look better.
More info:
If you’d like more info on each of these devices, I recommend their product pages on the Extron website. There’s tons of information available, as well as all of the manuals in the “downloads” section:
Extron RGB 201 Rxi / Extron RGB 203 Rxi
If you’re finished, I invite you to go back to the main page to see all the other retro-gaming awesomeness we have on this site…especially the RGB guide!


